

PEONIES &
SWEET PEAS
STEP-BY-STEP VISUAL GUIDE
One of the wonderful aspects of floristry is that you can take an incredible, elaborate design, and cleverly simplify it, whilst still retaining the original beauty. Complex designs intended for sumptuous celebrations can happily inspire simpler arrangements, that are better suited for more everyday and informal settings.
This design is exactly that. It’s an interpretation of a larger arrangement, one that dramatically stretches the full length of a table and elegantly puddles onto the floor, a super design for glamorous weddings and events. The simpler version instead, is perfect for a relaxed lunch or dinner, and at home, to brighten a kitchen table.
This design uses everyday vessels and a mass of incredible early summer blooms. I hope it provides plenty of inspiration … and to note, the base mechanics and methods also work perfectly anytime of year, with a mixture of different seasonal stems and foliage.

INGREDIENTS
From left to right (top row, followed by middle and then bottom row):
JASMINE
DAUCUS CAROTA
COLUMBINE
PEONIES, RED SARAH BERNHARDT
HAZEL
PEONIES, SARAH BERNHARDT
LYSIMACHIA (Purple Loosestrife)
FOXGLOVE BEARDTONGUE
DAUCUS CAROTA
SWEET PEAS, DEEP RED
VESSELS
Simply a recycled wine box and glass tumblers. If you don’t have wooden wine boxes to hand, you can replace with any rectangular shaped box (made form any material incl. wicker, wood, card, tin etc.) and if you are keen to source similar boxes, you can find a plethora available online. You can use any size tumblers, as long as they fit snuggly inside your chosen box.

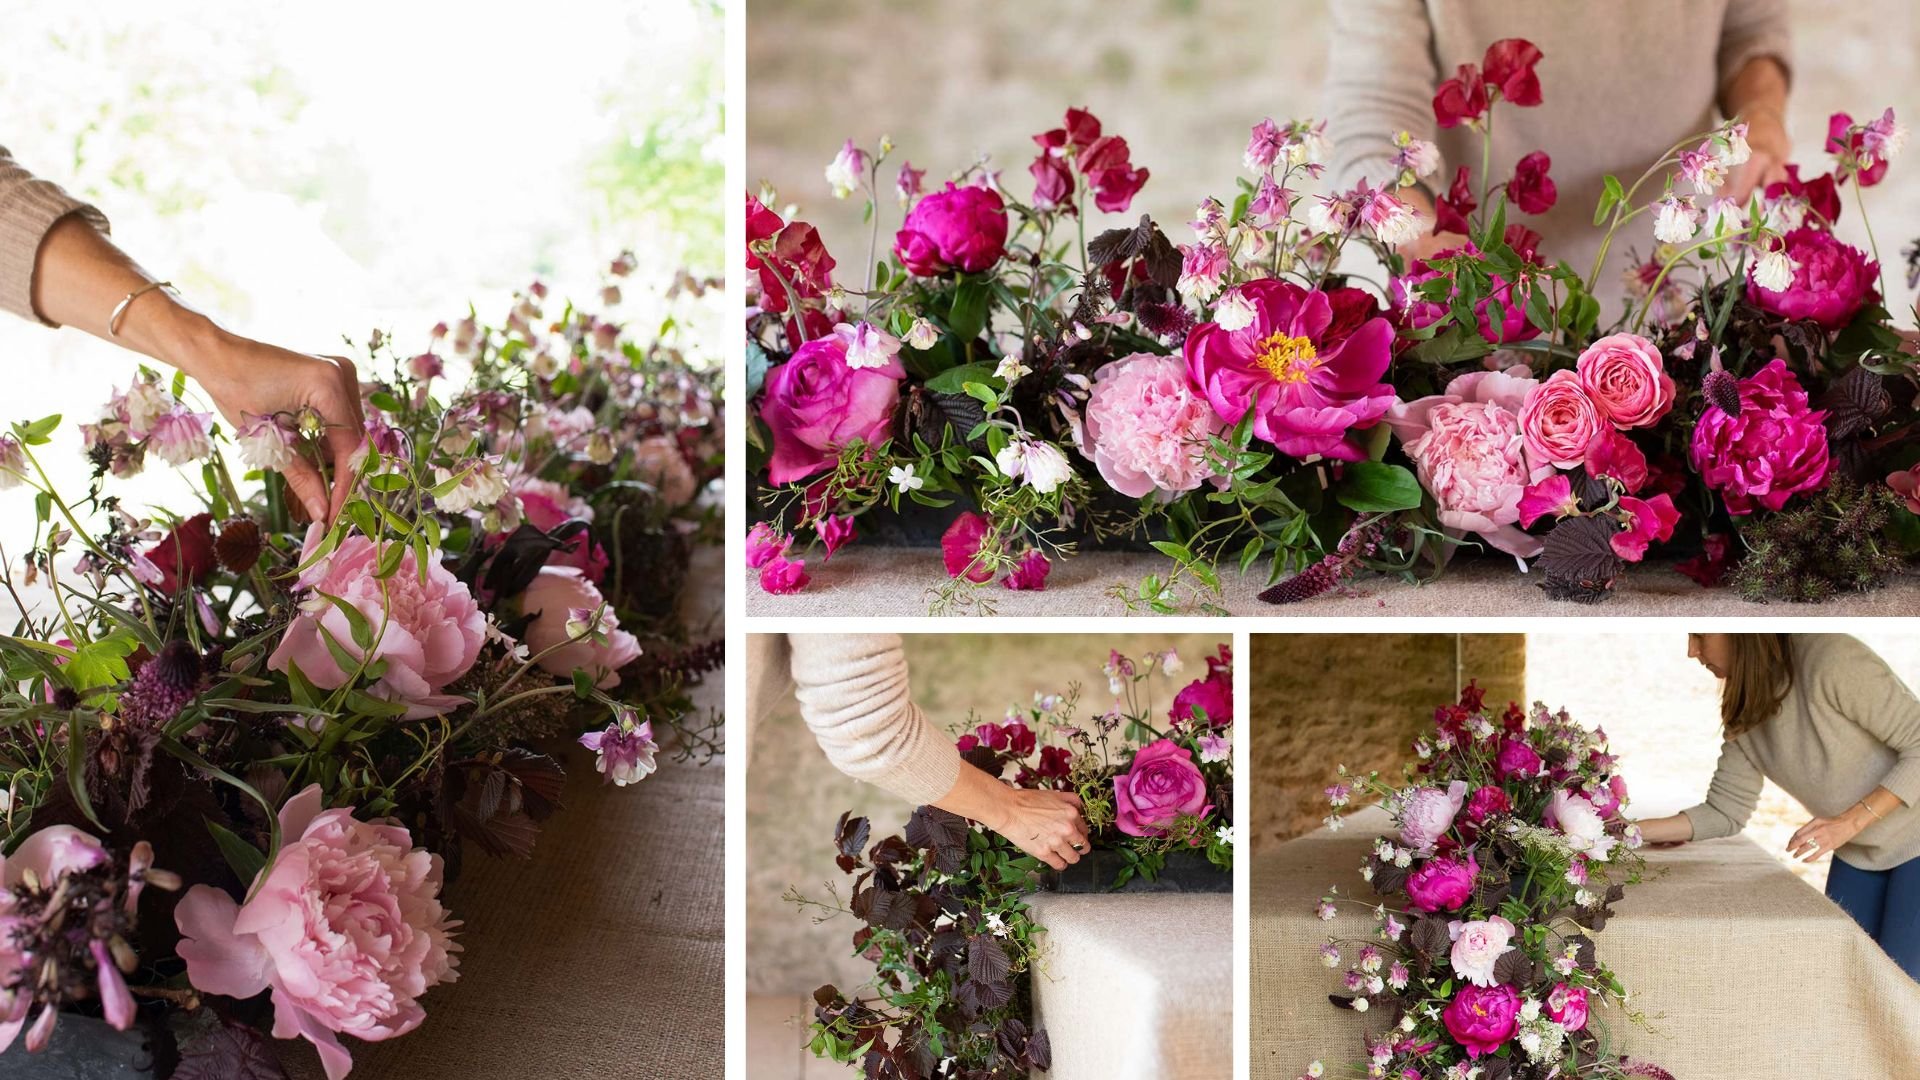
ORIGINAL DESIGN INSPIRATION
This inspiration of our Step-by-Step comes from the arrangement below, which forms part of a long and low table design, with full and elaborate drops at either end. An incredible, breathtaking design, which as you can see within this guide, we can beautifully simplify and create a more practical, everyday arrangement.


PREPARING THE BASE MECHANICS

1.WATERTIGHT
Fill each tumbler approximately half full with water. Then place the glass tumblers into the outer vessel. You can use any container you have to hand - wicker, basket, tin, wood, card etc. - without worrying about it not being watertight.

2.TUMBLERS
The best tumblers to use are taller than they are wide, this shape will help to support your stems. Ideally you are looking for tumblers to be either a similar height or shorter, as you want them to be a hidden within the design.
CREATING THE DESIGN

3.ADD FOLIAGE
Add your very first stems of foliage into the tumblers. If they are relatively narrow, taller than they are wide, then the sides of the tumbler will support your stems.

4. VARIETIES OF FOLIAGE
Add a mixture of foliage, in varying colour tones, heights and depths. Adding trailing vines as part of your foliage mix, placed over the side of the vessel and almost touching the table, creates a beautiful, natural, organic shape to the overall design.

5. focal flowers
Place your larger, focal flowers relatively low in the design. This is both important from a visual point of view, as the larger flowers look balanced when they are nestled, lower down into the design …

… and also from a practical support point of view, the shorter stems will be held more comfortably, without risk of them toppling out of the sides of the tumblers.

6. add height
Place your taller, slender stems within the design. These are best added towards the end, by which point the previous flower stems will have created a scaffold structure, which will support and hold the lighter, taller stems high within the design.

6. TEXTURE
The combination of larger focal flowers, set against the base of foliage and the supporting stems gives a strong sense of depth and texture to the design, which naturally carries your eyes between the different components.

7. FLOW
One of the keys to this design is the flow between the flowers, outer vessel and the table the design sits on. You want all of them to flow and work together. The way to achieve this, is to add additional trailing stems out of the side of the vessel and gently trailing onto the table.

8.EXTENDING THE DESIGN
You can extend the design to any length, to reach the full length of the longest of tables. Simply repeat the design steps above, to create a series of flower filled boxes.

9. PLACEMENT
Place the boxes close enough together for the flowers just to touch, with clear gaps between the boxes. This creates an incredible full flow for the flowers, with a lightness to vessels (if the boxes were touching, they would appear overly dense and solid, acting like a barrier down the table).
FINAL THOUGHTS
I love the way the two designs - the original elaborate arrangement and the simpler interpretation - look relatively similar, yet the interpretation follows significantly quicker and easier steps, with far fewer flowers.
I hope these steps inspire you to create your own simplified table design, using everyday vessels and bold colours this season.


FREE WEBINAR
THE PERFECT START - FOUR KEY STEPS TO SET UP AND REFRESH WITH CONFIDENCE | STARTING MAY 21st
TURN YOUR LOVE OF FLOWERS INTO A LIFELONG SKILL & A POTENTIAL CAREER CHANGE
COMING SOON - a FREE Webinar.
You’ll learn the four core fundamentals that will create a perfect clean start in your floristry journey. It's an in-depth guide for home arrangers, those who are new to floristry, those who are potentially thinking about a new career within floristry and for professional florists looking for a gentle and positive refresh.
The training includes my four key fundamentals to help you feel excited and confident about your own floristry and design skills.
Over 30mins you’ll learn:
How to set up a simple, effective space.
Where to source your cut flowers
The most important sustainable methods and tools.
Key ways to find inspiration for your own designs.
We are hosting the Webinar over three days towards the end of May, on Sunday 21st, Monday 22nd and Tuesday 23rd - seats are limited each day.
We will be sharing more information within our Newsletters soon (if you haven’t already, you can sign up to receive our Newsletters below).
MORE IN THE JOURNAL

ELEVATING CLASSIC STRUCTURES

HOW TO BOOST HELLEBORE LONGEVITY
CARE GUIDE & EXPERT TIPE